Create a Responsive, Fluid HTML5/CSS3 based website on Umbraco 7 using Bootstrap 3.0 Framework
Building responsive, fluid HTML5/CSS3 based websites are a rage these days delivering the best ROI for clients investing in building new web sites. Building a single website which adapts itself depending on the device screen size gives end users richer experiences. There are several ways of building responsive websites, one of the popular ways to to use an existing framework like Bootstrap which provide base scaffolding to quickly build responsive websites. In this blog post I am going to focus on how to integrate Bootstrap v3.0.X with Umbraco 7 to build a HTML5/CSS3 based fluid responsive website. The goal is to build a simple single page responsive web page similar to the Jumbotron bootstrap sample and focus on the integration part so that you can build more complex layouts as required. I plan to build upon this sample in future blog posts.
This article assumes you have setup Umbraco 7 in VS 2013 as given in my previous blog post Setting up Umbraco 7 in Visual Studio 2013 for MVC 4 development.
Getting Started with Bootstrap integration
Open up the Umbraco 7 project in Visual Studio 2013 and start the Nuget Package Manager from Tools menu –> Library Package Manager –> Package Manager Console. On the Package Manager Console Screen, type the command Install-Package bootstrap. Please refer to Figure 1 to see the command being executed.
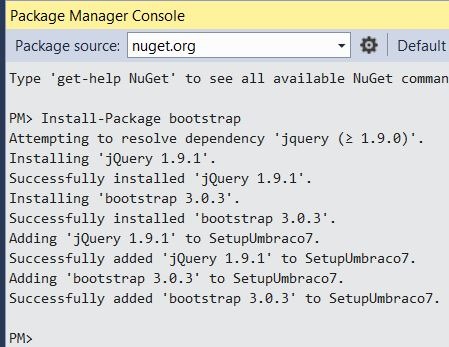
Figure 1: Install Bootstrap from Nuget
The above command will install the latest version of Bootstrap, currently its 3.0.3. The folder structure of the nuget package contents are different from the folder structure required by Umbraco. So we will have to move some files around to ensure that the bootstrap files are available within the Umbraco framework to be used. This nuget package creates the folders Content (for CSS files), Fonts (for Font files) and places JavaScripts in the Scripts folder in the root of the project. Umbraco needs style sheet files to be placed in the CSS folder. In the Solution Explorer window, expand the Content folder and select the bootstrap-theme.min.css and bootstrap.min.css style sheet files and drag them into the the CSS folder below as shown in Figure 2 below. This action will copy over the style sheet files we want to use into the correct Umbraco folder, the Font files and Script files are in their correct folders and do not need any change. Now bootstrap is ready to be used within our Umbraco template.
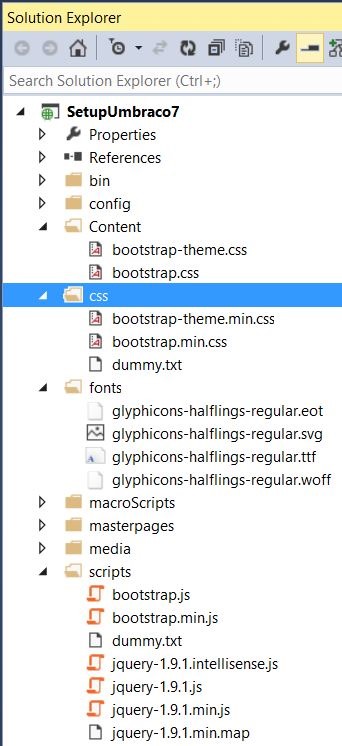
Figure 2: Solution Explorer – after copy of 2 style sheet files.
Building Our Responsive, Fluid Sample
The simple web page that I plan to build will have single Homepage as shown in the Jumbotron bootstrap sample. Before you being building any website in Umbraco its very important to identify the sites structure followed by the structure of each page. Its essential that this information is thought through before hand so that its easier to arrange the Umbraco doctypes and templates accordingly. Figure 3 displays the layout for the Home page.
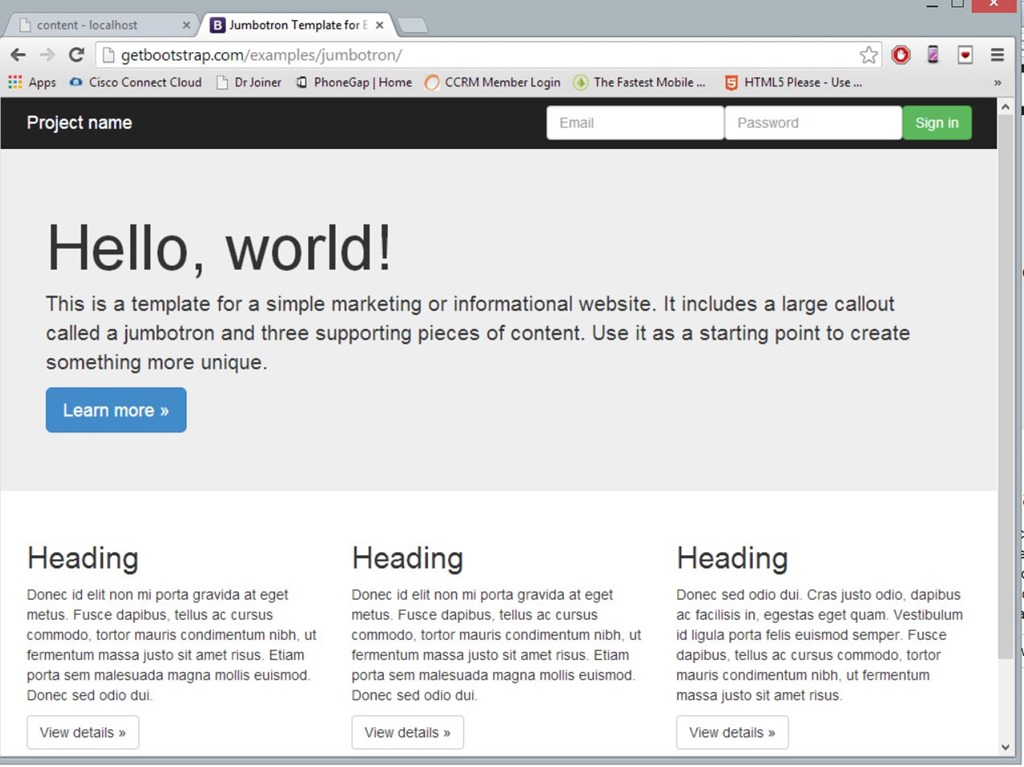
Figure 3: Home Page layout
As you can see from Figure 3 above the page has three distinct areas primary message, 3 secondary messages and login control. Both the Primary Message and Secondary Message areas have title and content areas. Once we have fixed the areas of the page we will define them as editable below so that the content editors can edit the appropriate content based on the structure of the page and not worry about its display format.
Since we are trying to build a replica of the Jumbotron Bootstrap sample, the best way to start is to analyze its source and build appropriate parts in Umbraco. You should follow this method whenever you try to implement a template which has predefined HTML/CSS provided with the designer. Open the Jumbotron sample in the browser right-click and select View Source from the context menu. This source will act as our guide while we try to build our template. The neat feature of Umbraco is that it can create identical HTML from its template without injecting any tags of its own. This is a great feature when you want to implement a new website based on designs provided by a designer. Listing 1 below shows the source code for the Jumbotron sample.
<!DOCTYPE html>
<html lang="en">
<head>
<meta charset="utf-8">
<meta http-equiv="X-UA-Compatible" content="IE=edge">
<meta name="viewport" content="width=device-width, initial-scale=1.0">
<meta name="description" content="">
<meta name="author" content="">
<link rel="shortcut icon" href="../../docs-assets/ico/favicon.png">
<title>Jumbotron Template for Bootstrap</title>
<!-- Bootstrap core CSS -->
<link href="../../dist/css/bootstrap.css" rel="stylesheet">
<!-- Custom styles for this template -->
<link href="jumbotron.css" rel="stylesheet">
<!-- Just for debugging purposes. Don't actually copy this line! -->
<!--[if lt IE 9]><script src="../../docs-assets/js/ie8-responsive-file-warning.js"></script><![endif]-->
<!-- HTML5 shim and Respond.js IE8 support of HTML5 elements and media queries -->
<!--[if lt IE 9]>
<script src="https://oss.maxcdn.com/libs/html5shiv/3.7.0/html5shiv.js"></script>
<script src="https://oss.maxcdn.com/libs/respond.js/1.3.0/respond.min.js"></script>
<![endif]-->
</head>
<body>
<div class="navbar navbar-inverse navbar-fixed-top" role="navigation">
<div class="container">
<div class="navbar-header">
<button type="button" class="navbar-toggle" data-toggle="collapse" data-target=".navbar-collapse">
<span class="sr-only">Toggle navigation</span>
<span class="icon-bar"></span>
<span class="icon-bar"></span>
<span class="icon-bar"></span>
</button>
<a class="navbar-brand" href="#">Project name</a>
</div>
<div class="navbar-collapse collapse">
<form class="navbar-form navbar-right" role="form">
<div class="form-group">
<input type="text" placeholder="Email" class="form-control">
</div>
<div class="form-group">
<input type="password" placeholder="Password" class="form-control">
</div>
<button type="submit" class="btn btn-success">Sign in</button>
</form>
</div><!--/.navbar-collapse -->
</div>
</div>
<!-- Main jumbotron for a primary marketing message or call to action -->
<div class="jumbotron">
<div class="container">
<h1>Hello, world!</h1>
<p>This is a template for a simple marketing or informational website. It includes a large callout called a jumbotron and three supporting pieces of content. Use it as a starting point to create something more unique.</p>
<p><a class="btn btn-primary btn-lg" role="button">Learn more »</a></p>
</div>
</div>
<div class="container">
<!-- Example row of columns -->
<div class="row">
<div class="col-md-4">
<h2>Heading</h2>
<p>Donec id elit non mi porta gravida at eget metus. Fusce dapibus, tellus ac cursus commodo, tortor mauris condimentum nibh, ut fermentum massa justo sit amet risus. Etiam porta sem malesuada magna mollis euismod. Donec sed odio dui. </p>
<p><a class="btn btn-default" href="#" role="button">View details »</a></p>
</div>
<div class="col-md-4">
<h2>Heading</h2>
<p>Donec sed odio dui. Cras justo odio, dapibus ac facilisis in, egestas eget quam. Vestibulum id ligula porta felis euismod semper. Fusce dapibus, tellus ac cursus commodo, tortor mauris condimentum nibh, ut fermentum massa justo sit amet risus.</p>
<p><a class="btn btn-default" href="#" role="button">View details »</a></p>
</div>
</div>
<hr>
<footer>
<p>© Company 2013</p>
</footer>
</div> <!-- /container -->
<!-- Bootstrap core JavaScript
================================================== -->
<!-- Placed at the end of the document so the pages load faster -->
<script src="https://code.jquery.com/jquery-1.10.2.min.js"></script>
<script src="../../dist/js/bootstrap.min.js"></script>
</body>
</html>
Listing 1: Jumbotron bootstrap sample source code.
We need to analyze this source to figure out all its external dependencies like images, style sheets and javascripts to ensure we have that available on our project structure. On analyzing the elements in Listing 1 above we can see that there is a reference to a favicon.png, ie8-responsive-file-warning.js and jumbotron.css files which we do not have in our project. The favicon.png and ie8-responsive-file-warning.js we will omit as its not necessary for this sample, you can provide it and change its path as necessary in your project. The missing jumbotron.css file is what we need to add to our project.
Add new Stylesheet to Umbraco
We need to add our custom jumbotron.css style sheet into to the project, this style sheet will contains styles which are specific to our site. Right click the css folder in the Solution Explorer and select Add –> New Item to open the Add New Item dialog. Select Style Sheet from the templates selection and give the name jumbotron.css and click OK to create the style sheet file. If you are viewing the source of the jumbotron sample is a browser like chrome, then click jumbotron.css file referenced to see its source. Copy paste the code from the css source (as shown in listing 2 below) into the jumbotron.css style sheet file open in visual studio. Listing 2 contains all the styles required by our custom website, feel free to update the style sheet as per your requirements. Save the file and we are ready to start building templates in Umbraco.
/* Move down content because we have a fixed navbar that is 50px tall */
body {
  padding-top: 50px;
  padding-bottom: 20px;
}
Listing 2: Jumbotron.css style sheet
Creating the Site base Document Type
Now that we have addressed all the external dependencies of the site, its time to start working on the Umbraco templates. Run the Umbraco project in Visual Studio, it will launch the site in the default browser and inform you that site needs to be setup. Click on the Setup your new website button to be redirected to Umbraco administration site. Provide the credentials Username: root and Password: @123test (if you are using code from my previous sample) to login to the administration control panel.
The first step for creating a new site is to create a new Document Type in Umbraco. Umbraco allows you to nest Document Types, its an important feature to ensure that common properties for all documents are defined at the base document level so that they are reused in child document types. Its very similar to the master page concept in ASP.NET, but different given the fact that master pages deal with layouts (which are similar to the Templates concept in Umbraco) while document types deal with defining properties that will be available for the CMS Content Editor to edit. In our case there are three properties that we need to define on the base document type: SEO Title, SEO Description and umbracoNaviHide. The first two properties are self explanatory and will map to title and description meta tag in the content header. The 3rd property is specific named Umbraco property. Basically if you set the umbracoNaviHide property on any of the content pages it will make the page invisible from the navigation menu’s even though the page remains published. This property is optional, but I find it a good practice to include it since there are pages like Sitemap which need not show up in the navigation menu but at the same time they are required.
Click on Settings –> Document Type (…) –> + Create as shown in figure 4 below to create a new Document Type.
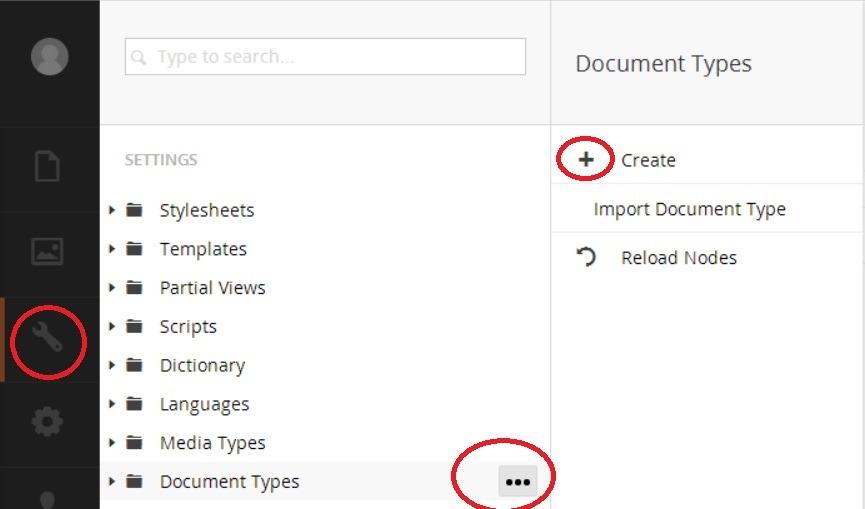
Figure 4: Create new Document Type
In the Create dialog provide the Name as [PageBase] and click Create to create the Document Template as well as a matching Template with the same name as shown in figure 5. The Template will be used as our Master Layout.
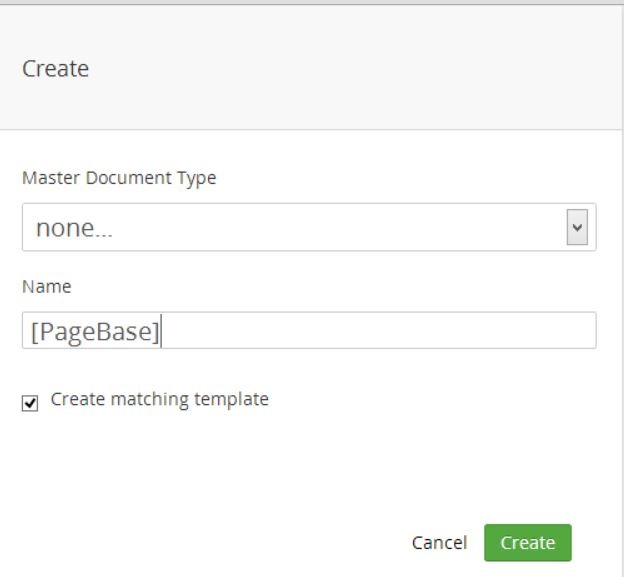
Figure 5: Create new [PageBase] document type and Template
The [Pagebase] document type will open in the editor. Switch to the Generic properties tab and click on the Click here to add a new property link to add the 3 properties as listed below and save them. Figures 6 to 8 show them being added.
Name: SEO Title
Alias: sEOTitle
Type: Textstring
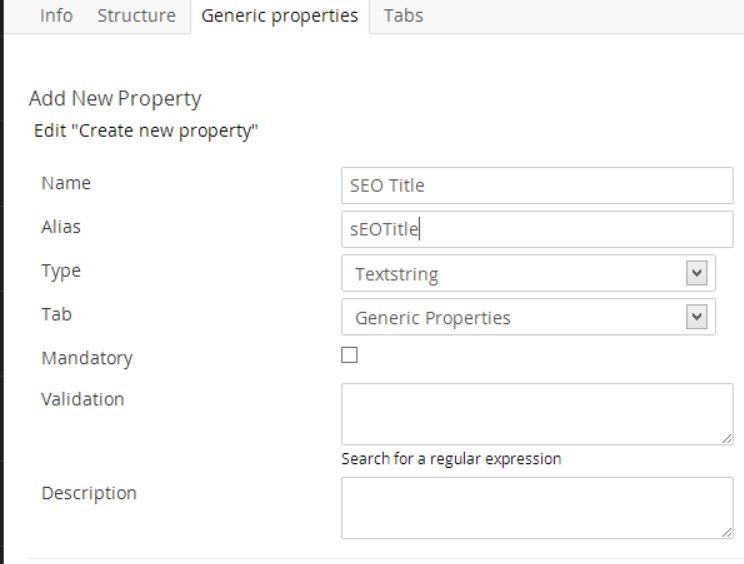
Figure 6: SEO Title Property
Name: SEO Description
Alias: sEODescription
Type: textbox multiple
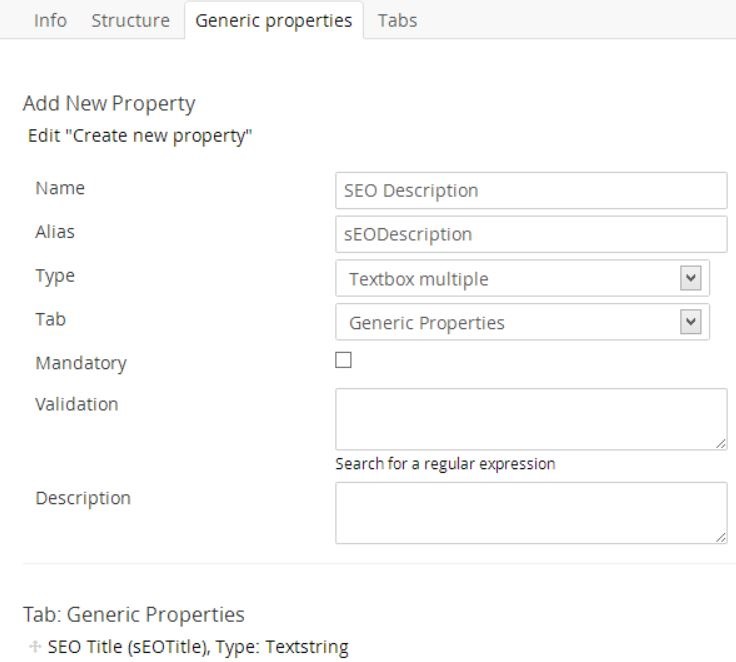
Figure 7: SEO Description Property
Name: umbracoNaviHide
Alias: umbracoNaviHide
Type: True/false
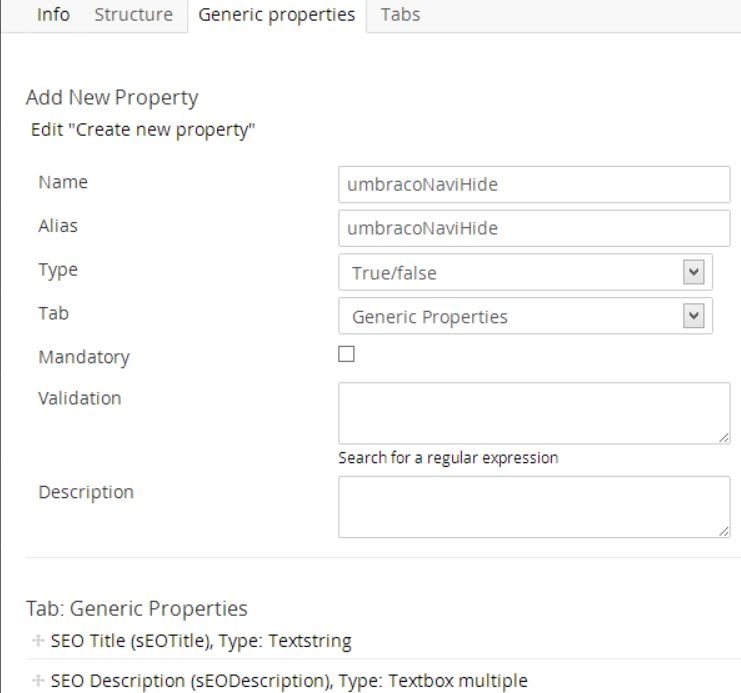
Figure 8: UmbracoNaviHide property
Now that we have our base page setup we need to create Partial View for our Site Navigation Header so that we can include it into our [PageBase] template. Right click Partial Views under Settings and select Create from the menu. In the Create dialog give the Name as Navigation and click Create to create the Partial view and open its editor. Copy paste the code from listing 3 below into the editor and click the Save button to save the partial view.
@inherits Umbraco.Web.Mvc.UmbracoTemplatePage
@*
    Macro to display child pages below the root page of a standard website.
    Also highlights the current active page/section in the navigation with
    the css class "current".
*@

@{
    @*Get the root of the website *@
    var root = CurrentPage.AncestorOrSelf(1);
}
 <div class="navbar navbar-inverse navbar-fixed-top" role="navigation">
      <div class="container">
        <div class="navbar-header">
          <button type="button" class="navbar-toggle" data-toggle="collapse" data-target=".navbar-collapse">
            <span class="sr-only">Toggle navigation</span>
            <span class="icon-bar"></span>
            <span class="icon-bar"></span>
            <span class="icon-bar"></span>
          </button>
          <a class="navbar-brand" href="#">Project name</a>
        </div>
        <div class="navbar-collapse collapse">
          <ul class="nav navbar-nav">
           @foreach (var page in root.Children.Where("Visible"))
           {
             <li class="@(page.IsAncestorOrSelf(CurrentPage) ? "active" : null)">
               <a href="@page.Url">@page.Name</a>
             </li>
           }
          </ul>
          <form class="navbar-form navbar-right" role="form">
            <div class="form-group">
              <input type="text" placeholder="Email" class="form-control">
            </div>
            <div class="form-group">
              <input type="password" placeholder="Password" class="form-control">
            </div>
            <button type="submit" class="btn btn-success">Sign in</button>
          </form>
        </div><!--/.navbar-collapse -->
      </div>
    </div>
Listing 3: Navigation Partial View
The above listing uses the Bootstrap Navigation bar component to build the navigation menu. We loop over all published and visible pages in Umbraco to build the dynamic navigation menu. You can see that rest of the HTML code is copied from the Jumbotron source which we had opened in the browser.
Under Settings, expand Templates node and click on the [PageBase] template to open it in Umbraco editor. This template was automatically created when we created the Document Type with the same name. This template will server as our Master Layout template. Copy Paste code from listing 4 into the editor and click the Save button to save the template in Umbraco.
@inherits Umbraco.Web.Mvc.UmbracoTemplatePage
@{
Layout = null;
}
<!DOCTYPE html>
<html lang="en">
<head>
<meta charset="utf-8">
<meta http-equiv="X-UA-Compatible" content="IE=edge">
<meta name="viewport" content="width=device-width, initial-scale=1.0">
<meta name="description" content='@Umbraco.Field("sEODescription")'>
<title>@Umbraco.Field("sEOTitle")</title>
<!-- Bootstrap core CSS -->
<link href="~/css/bootstrap.min.css" rel="stylesheet">
<!-- Custom styles for this template -->
<link href="~/css/jumbotron.css" rel="stylesheet">
<!-- HTML5 shim and Respond.js IE8 support of HTML5 elements and media queries -->
<!--[if lt IE 9]>
<script src="https://oss.maxcdn.com/libs/html5shiv/3.7.0/html5shiv.js"></script>
<script src="https://oss.maxcdn.com/libs/respond.js/1.3.0/respond.min.js"></script>
<![endif]-->
</head>
<body>
@Html.Partial("Navigation", @Model.Content)
<!-- Main jumbotron for a primary marketing message or call to action -->
<div class="jumbotron">
@RenderSection("jumbotron")
</div>
<div class="container">
@RenderSection("content")
<hr>
<footer>
<p>© Systenics Solutions 2013</p>
</footer>
</div> <!-- /container -->
<!-- Bootstrap core JavaScript
================================================== -->
<!-- Placed at the end of the document so the pages load faster -->
<script src="https://code.jquery.com/jquery-1.10.2.min.js"></script>
<script src="~/scripts/bootstrap.min.js"></script>
</body>
</html>
Listing 4: [PageBase] template
In the above listing I have defined a HTML5 based responsive template using Bootstrap classes where necessary. If you compare the code from Listing 3 below with the source from Listing 1 you will find that I have kept the HTML which will repeat on all pages in the [PageBase] template and the home page specific HTML has been replaced by RenderSection razor commands which will be rendered from the child templates. I have also changed the path for all local CSS and JavaScript files so that they point to the right local folder. The appropriate Bootstrap style sheets and JavaScripts have also been included into the template file. You will also find that I am using the Umbraco Field method to define the SEO Title and SEO Description properties that we defined on the [PageBase] document type on the page.
Now we need to define the Home Page document type, expand the Document Types node under Settings. Right click on the [PageBase] node and select Create from the menu. Provide the document name as Home and uncheck the Create Matching template checkbox and click Create button to create the Home document type under the [PageBase] document. We create it under the [PageBase] document so that it can inherit properties defined in the base document. Switch to the Structure tab and select Yes for Allow at root so that Home page can be the root of the site. Save the setting and switch to the Tabs tab so that we can define the tabs required for the Homepage. Add 2 new tabs named Primary Message and Secondary Message by entering the tab name and clicking New Tab button. Switch to the Generic Properties tab and add the following properties. These properties have been defined looking at the Jumbotron example and every bit of information that we want to be editable on the Home page needs to be defined as a property in the document type definition.
Name: homePrimaryMessageTitle
Alias: homePrimaryMessageTitle
Type: Textstring
Tab: Primary Message
Name: homePrimaryMessageContent
Alias: homePrimaryMessageContent
Type: Richtext editor
Tab: Primary Message
Name: homePrimaryLink
Alias: homePrimaryLink
Type: Content Picker
Tab: Primary Message
Name: homeSecondaryMessageTitle1
Alias: homeSecondaryMessageTitle1
Type: Textstring
Tab: Secondary Message
Name: homeSecondaryMessageContent1
Alias: homeSecondaryMessageContent1
Type: Richtext editor
Tab: Secondary Message
Name: homeSecondaryMessageLink1
Alias: homeSecondaryMessageLink1
Type: Content Picker
Tab: Secondary Message
Name: homeSecondaryMessageTitle2
Alias: homeSecondaryMessageTitle2
Type: Textstring
Tab: Secondary Message
Name: homeSecondaryMessageContent2
Alias: homeSecondaryMessageContent2
Type: Richtext editor
Tab: Secondary Message
Name: homeSecondaryMessageLink2
Alias: homeSecondaryMessageLink2
Type: Content Picker
Tab: Secondary Message
Name: homeSecondaryMessageTitle3
Alias: homeSecondaryMessageTitle3
Type: Textstring
Tab: Secondary Message
Name: homeSecondaryMessageContent3
Alias: homeSecondaryMessageContent3
Type: Richtext editor
Tab: Secondary Message
Name: homeSecondaryMessageLink3
Alias: homeSecondaryMessageLink3
Type: Content Picker
Tab: Secondary Message
Once you have saved all the properties your properties definition for the Home document type should look like figure 9 below.
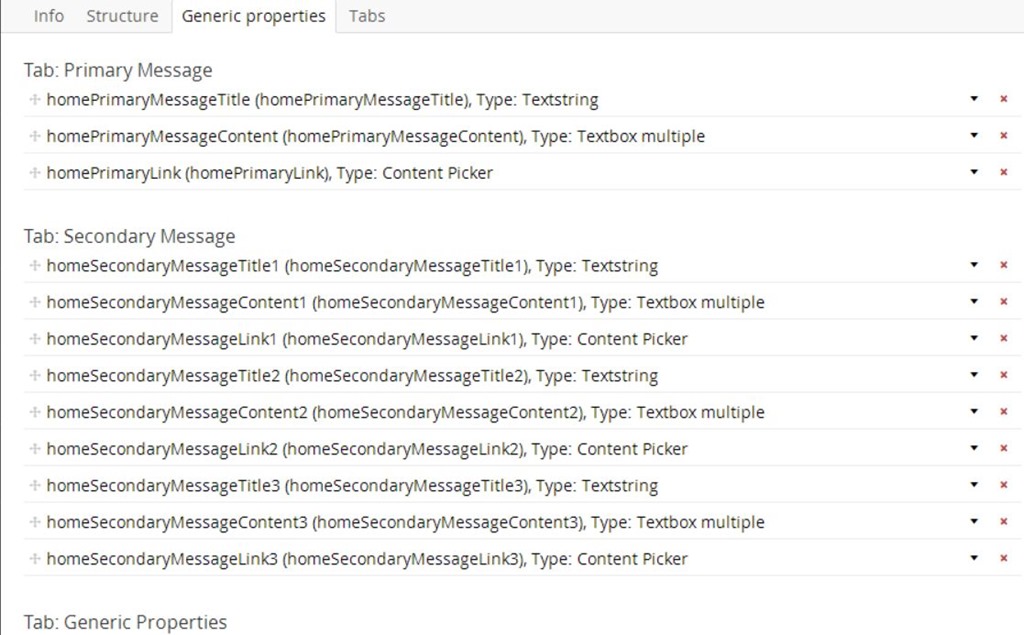
Figure 9: Home document type properties
Now let’s define the matching Home template so that we have appropriate containers defined to display the properties that have been added by us. Expand the Templates node under Settings and right click on the existing [PageBase] template and select Create from the menu to create a new template using [PageBase] as the master template. Enter the template name as Home and click Create button to create it. You will see that the new template uses the [PageBase] template as the master page template. Copy paste the code from Listing 5 below into the editor for Home template and click the Save button to save the template.
@inherits Umbraco.Web.Mvc.UmbracoTemplatePage
@{
Layout = "PageBase.cshtml";
}
@section jumbotron{
<div class="container">
<h1>@Umbraco.Field("homePrimaryMessageTitle")</h1>
<p>@Umbraco.Field("homePrimaryMessageContent")</p>
<p><a class="btn btn-primary btn-lg" role="button" href='@Umbraco.Field("homePrimaryLink")'>Learn more »</a></p>
</div>
}
@section content{
<!-- Example row of columns -->
<div class="row">
<div class="col-md-4">
<h2>@Umbraco.Field("homeSecondaryMessageTitle1")</h2>
<p>@Umbraco.Field("homeSecondaryMessageContent1")</p>
<p><a class="btn btn-default" href="#" role="button" href='@Umbraco.Field("homeSecondaryMessageLink1")'>View details »</a></p>
</div>
<div class="col-md-4">
<h2>@Umbraco.Field("homeSecondaryMessageTitle2")</h2>
<p>@Umbraco.Field("homeSecondaryMessageContent2")</p>
<p><a class="btn btn-default" href="#" role="button" href='@Umbraco.Field("homeSecondaryMessageLink2")'>View details »</a></p>
</div>
<div class="col-md-4">
<h2>@Umbraco.Field("homeSecondaryMessageTitle3")</h2>
<p>@Umbraco.Field("homeSecondaryMessageContent3")</p>
<p><a class="btn btn-default" href="#" role="button" href='@Umbraco.Field("homeSecondaryMessageLink3")'>View details »</a></p>
</div>
</div>
}
Listing 5: Home template
The above listing 5 lays out the appropriate HTML elements using Bootstrap styles and also uses Umbraco Field razor to provide placeholder for content that will be provided by the end user. Now that we have the Home template setup we need to update the Home document type so that it uses this template by default. Expand Document Types under Settings and then select the Home document type. Under the Info tab, Default Template choose Home from the drop down list and click Save button. Now we are all set to build our content page for the Home document type. Click on Content icon, right click on Content and click on Home from the menu to create a new Home page as shown in figure 10.
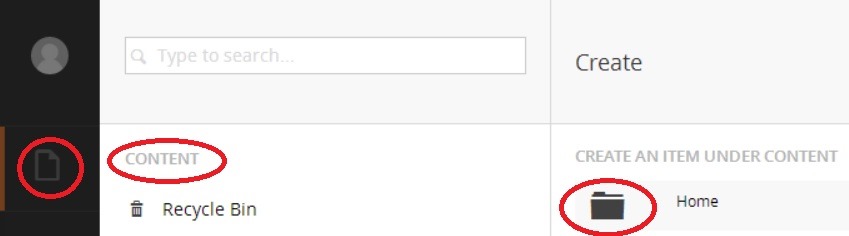
Figure 10: Add Home page
This action will create a new content page with the Home document type. Provide the Name as Home and fill up the properties for the page. The properties that we defined in the Home document type are shown as tabs. These same tabs will be available to your content editors to edit content for the page. As you can see the content page really hides the inner implementation details of the page and just presents the user with a friendly view to edit content as per their requirements. The power of Umbraco CMS shines in this aspect where you are given totally liberty to define the tabs and its editable properties so that the content is presented to content editors in a format they understand rather than training the content editors to understand the limited structure other CMS systems provide.
Fill up the content of each of the Home page tabs and save them as you proceed. Its important that you also fill up the SEO Title and SEO Description properties on the Properties tab. You can see that even though these properties were defined on the [PageBase] document type, they have been inherited by the Home document type. Once you have filled all the information, click on the Save and Publish button to publish the page and make it available for everyone to view as shown in Figure 11 below.
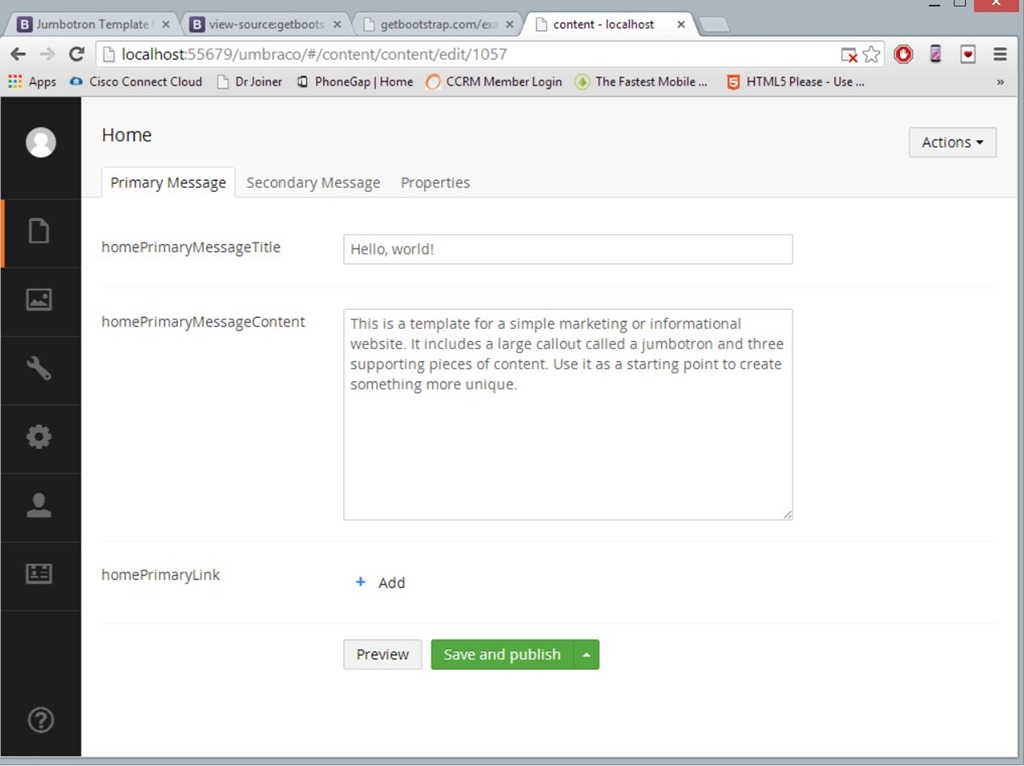
Figure 11: Save home page properties
Figure 11 shows the unpublished view of the Home content page. Once the page is published you can see that Umbraco has provided a published date as well as path to view the published page. If you click on that path or access the Umbraco website Url in a new browser you will be able to view the final result of the responsive website. You can use the Responsive Design View tool available in latest version of FireFox browser to test the responsive capabilities of the site. Figures 12 to 14 show the Home page rendered in different browser sizes.

Figure 12: 320x480 Mobile view of the Home page
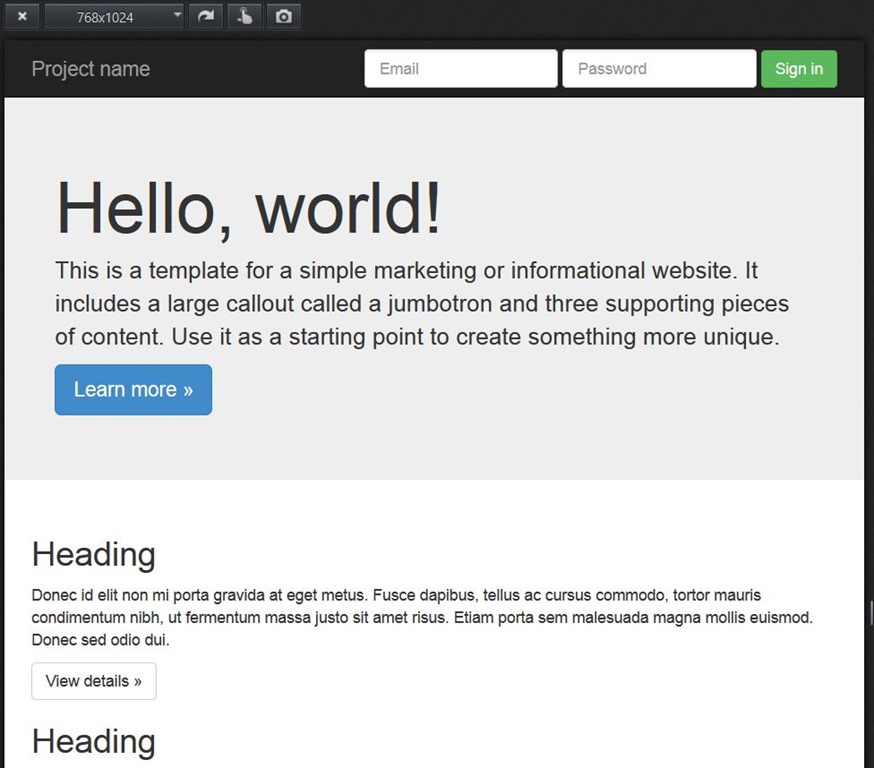
Figure 13: 768x1024 Tablet View
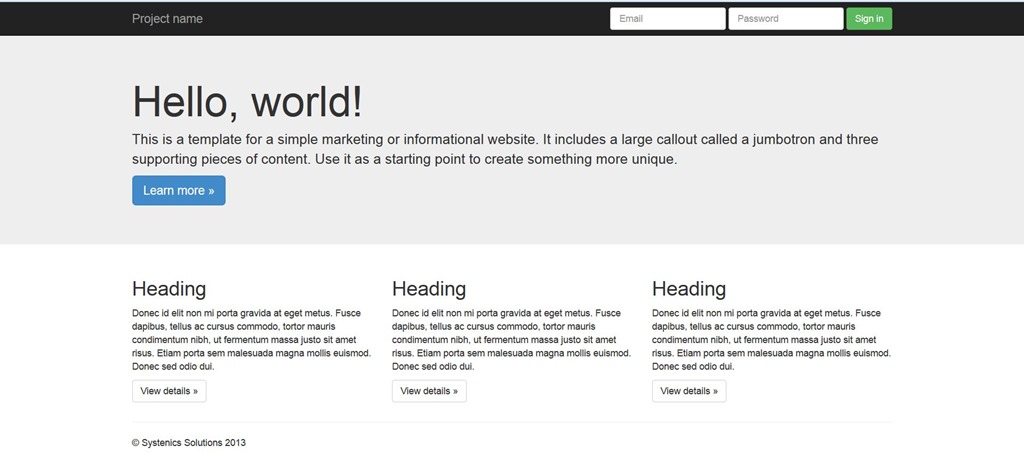
Figure 14: Full HD 1900x1080 view
The above 3 figures show the mobile, tablet and desktop view of the responsive Home page. You can see how the page menu automatically changes to an icon on the mobile screen (Figure 12,13) and other content elements are also laid out one below another on the mobile browser. You can see similar fluid changes between the tablet and desktop screen sizes.
Summary
In this blog post I have integrated the popular Bootstrap framework into Umbraco 7 CMS. I have covered all the steps related to integration as well as building your first responsive, fluid Home page in Umbraco 7. This blog post should serve as a starting point for anyone interested in building responsive fluid layouts on Umbraco 7. In future blog posts I plan to extend on this sample adding more features.
Download
Click here to download the sample used in this article.