Setting up CI for ASP.NET MVC to deploy on Azure Cloud WebApp using Visual Studio Team System
Overview
Importance of DevOps is growing by the day as development teams adopt agile practices and start on the path of shorter development cycles. Having a good Continuous Integration system in place is one of the key parts of DevOps setup. In this blog I will explore the process of getting a simple ASP.NET MVC application configured using Online Visual Studio Team System's Build and Release process to deploy to an Azure WebApp.
Microsoft has a great offering in Online Visual Studio Team System which is robust as well as feature rich and best of all its free for up to 5 users, even for private projects! Microsoft Azure has been a competitive cloud offering and its WebApps service is a perfect choice for ASP.NET MVC applications as it takes away the hassles of maintenance of VM and provide some great scaling options. In this blog I will use the default VS generated ASP.NET MVC 5 application and configure it in VSTS for CI deployment to Azure Web App.
Setting Up ASP.NET MVC Project
Our focus is not the MVC application but the configuration of the CI process, hence I choose use the default VS generated ASP.NET MVC application to get started. So fire up Visual Studio and create a new project using the ASP.NET Web Application (.NET Framework) template. Select Create new Git repository option on the New Project dialog as shown in Figure 1 below to initialize the Git repo. Later, we will connect this Git repo with the remote VSTS based Git repo.
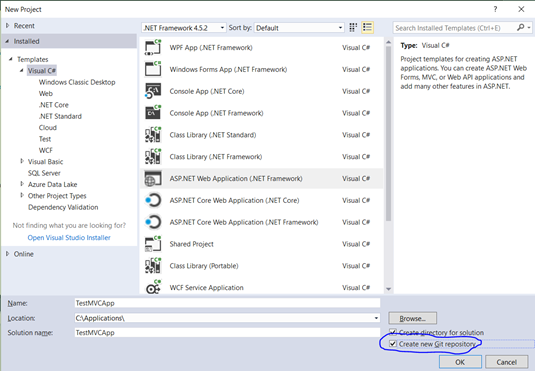
Figure 1: New Project dialog – Visual Studio
On the New ASP.NET Web Application dialog select the MVC template. Select the Add unit tests option so that a test project is added to our solution. Later, we would want to run the tests on CI to ensure our build was successful. Also click on Change Authentication button and select the authentication type as Individual Users as shown in Figure 2 below. Click OK to create the new project.
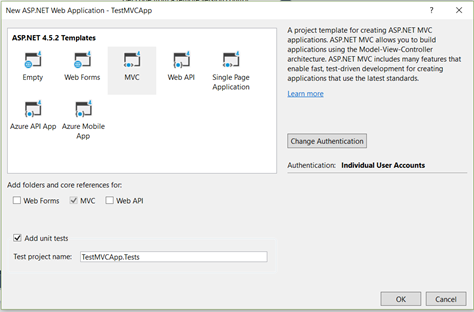
Figure 2: New ASP.NET Web Application
Build and run the project to ensure its working correctly locally. Run the tests from the Test menu to ensure they succeed, at this point the tests are auto generated and simple calls to the home controller but enough for purpose of our blog.
Configuring Entity Framework Migrations
Although the default ASP.NET MVC project is pretty straight forward and easy to setup, it presents a challenge from CI perspective. The default ASP.NET MVC project uses Entity Framework Code First approach to upgrade the database. While the process of database migration is straight forward while publishing directly from Visual Studio, it presents several challenges when we try to achieve it during CI. The general recommendation is not to use Entity Code First approach if you want to go down the CI route and instead use the MS Database project or several other database migration options available.
In case you still wish to stick with using EF Code First approach, then there are two main options available. The first, most logical one for large projects, is to package EF tool migrate.exe along with your project and then invoke it during the CI release process. One most important point to remember is that the agent running the Release process needs to be able to connect to the Azure Database server, so you need add appropriate firewall rules before you run the migrate tool.
The second approach, more suited for smaller projects but definitely not suited for a live production system is to modify the project codebase to run migrations when it first connects to the database server. In this case the database will get migrated after it build is deployed to the server and if anything goes wrong during migration you will not be able to roll back the build! I will use this approach in the current blog because EF migrations would make a separate blog entry, but at least it will provide some support for migrations in the current blog scope.
Open the Package Manger window in Visual Studio and run the enable-migration command to enable migrations for the project and let the initial migration scripts be generated. Then open the Startup.cs file and update it to include the additional using statements as well as to set EF to migrate the database to the latest version.
using Microsoft.Owin;
using Owin;
using System.Data.Entity;
using TestMVCApp.Models;
using TestMVCApp.Migrations;

[assembly: OwinStartupAttribute(typeof(TestMVCApp.Startup))]
namespace TestMVCApp
{
    public partial class Startup
    {
        public void Configuration(IAppBuilder app)
        {
            ConfigureAuth(app);
            Database.SetInitializer(new MigrateDatabaseToLatestVersion<ApplicationDbContext,Configuration>());
        }
    }
}
Next, open the auto-generated Configuration.cs file from the migrations folder and add the following lines to the Configuration method to ensure that migration scripts run automatically when the application is invoked.
  AutomaticMigrationsEnabled = true;
  AutomaticMigrationDataLossAllowed = true;
You can build and ensure that the project is building and working fine locally.
Sync Project with VSTS Git Source Control
Now that our project is ready, it's time to upload it to online Git repository. You need to use your Microsoft Credentials to signup and create a project on VisualStudio Online (if you don't have one already). It's free to create unlimited private projects to be shared up to 5 users. Once you have created your project, navigate to the Code section of your project to get the URL to the Git repository of you project. Copy the Git Repository URL shown on the page, we will need it to add our project to source control.
Since we have already crated a VS project in the steps above we need to add it to the remote Git repository. In Visual Studio, open the Team Explorer and click on the Sync button as shown in Figure 3 below.
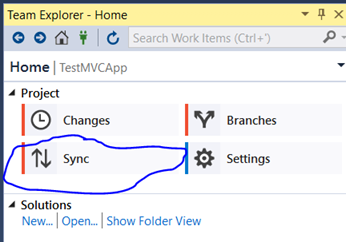
Figure 3: Sync with Remote Repository
VS will recognize that we do not have any remote Git repo associated with our codebase and give us an option to connect with an online Git repo as shown in Figure 4.
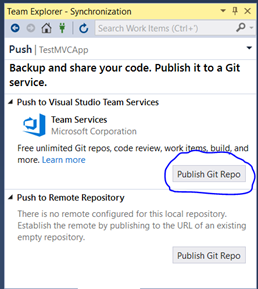
Figure 4: Publish Git Repo
Click on the highlighted Publish Git Repo button and follow the wizard to login into the Microsoft Account, use the same account which has permissions on the Visual Studio Online project that we crated earlier. Once you are logged into your Microsoft account you will be presented with a screen similar to Figure 5, which allows you to choose your VSTS Domain and the Project that you wish to use for this application.
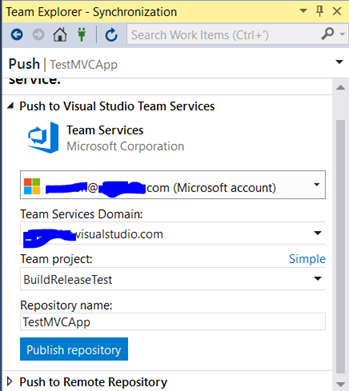
Figure 5: Select VSTS Project details
Make sure you have the right project details setup, click on the Advance button in the screen above to input the name of the Team Project in which you want to host the source for this application. Finally click on Publish repository button to push the local git changes to the VSTS hosted remote repo. Now that our online Git repo is ready we can move ahead with the CI configuration.
Azure Web App and SQL Server
Creating and configuring an Azure Web App and SQL Server are out of the scope of this article. I assume you have one created and have the required parameters and credentials noted down. I am using the Web + SQL azure template to create a Basic version of the Web App and Free SQL Server for lower costs in the demo. Make sure that you have correctly changed the connection string in your project to point to the Azure SQL DB, so that your application can connect with the Azure SQL DB.
Configuring Azure Account as a Connected Service in Online VSTS
Navigate to the online VSTS website and login to your project in which you wish to automate the build. You will see a gears settings icon once your project is selected, hover over it and select Services from settings menu as shown in figure 6.
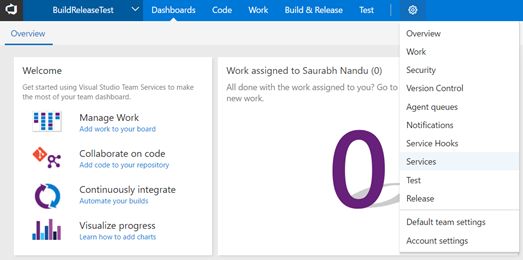
Figure 6: Select Services setting for VSTS Online
On the Services page click on the + New Service Endpoint button and select Azure Resource Manager from the list of options. Provide a Connect Name that's easy to remember and select the Azure Subscription that you are trying to connect. It's always easy if both your VSTS and Azure accounts share the same Microsoft account. Also remember the you need to have admin permission on both the VSTS Online Project as well as in Azure to be able to perform this step. If you do not have appropriate permissions in Azure as well as the Default Azure Active Directory for your account you will run into all kinds of permission errors! Once you have the Azure service connected in VSTS we can proceed to configure our Build process.
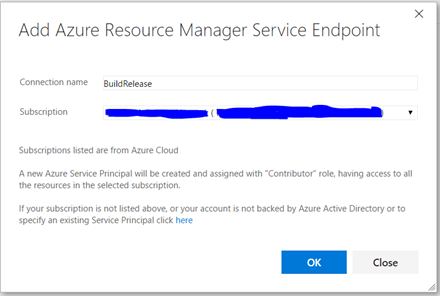
Figure 7: Add Azure Resource Manager Service Endpoint
Configuring VSTS CI Build Automation
In VSTS online, click on the Build & Release menu and select + New to add a new Build Definition. Select ASP.NET (PREVIEW) from the template library and click Apply to load a default set of tasks used to ASP.NET projects as shown in Figure 8.
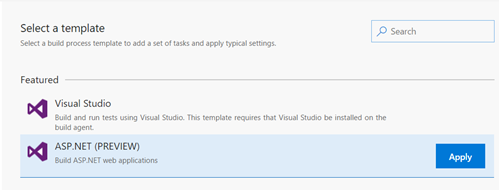
Figure 8: Add new Build Definition
VSTS Online build definition provides various in-built templates for popular application types. You can also start with an Empty Template and add your own Build Tasks. In this blog, I am using the ASP.NET build template which is perfect for our current requirements. Figure 9 shows a list of build tasks that have been configured by default. They get the source from Git, built it using VS, test it and finally copy the source code for deployment. 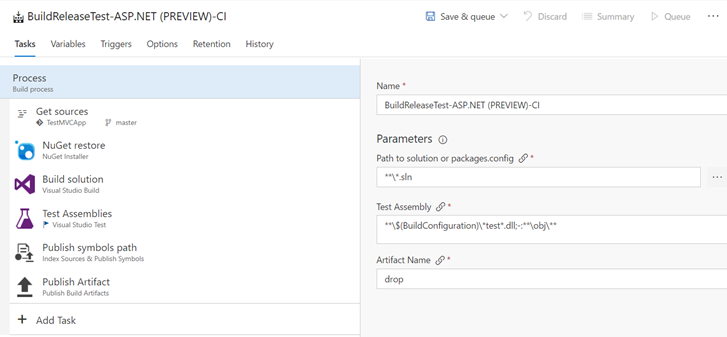
Figure 9: ASP.NET Build tasks
You can click around in each of the Build tasks to look at their parameter values and change it appropriately as required. New tasks can also be added and ones like Public symbols path, if not required can be removed as well. Switch to the Triggers section on this screen to configure Continuous Integration, turn on the Enable this trigger option and you will see that it auto populates the name of the repository being used as well as its branch to monitor. By default, any changes pushed in the master branch will trigger the build. That is the correct setting for us right now but if you have multiple different branches for development and production you can configure the it from this screen as shown in Figure 10. I will leave the default template values and click on the Save button (under Save & Queue) menu above to save the template.

Figure 10: Configure CI Trigger
Configuring VSTS CI Release Automation
Now that we have configured our Builds to auto trigger on every branch push, we also need to configure the Release of the build to our azure web app. Switch to the Releases tab in online VSTS and click on + New definition to create a new Release definition. Select the Azure App Service Deployment template and click Next, as shown in Figure 11.
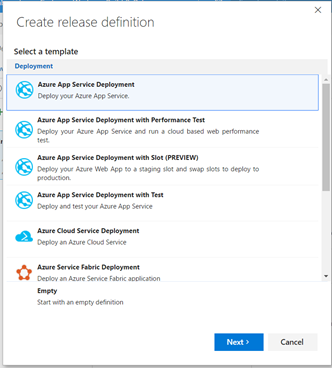
Figure 11: Create release definition
The next screen allows you the view the project name and the source control name, let these values be at default. Select the Continuous deployment checkbox to ensure that as soon as a build is completed, its auto released to Azure. Click Create to create the release definition.
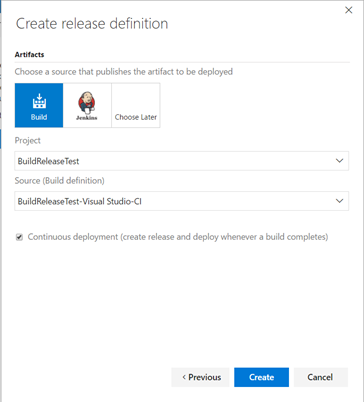
Figure 12: Create release definition – 2
Once the release definition is created you will see tasks listed for Environment 1. Select the Deploy Azure App Service task and input the Azure Subscription and App Service Name. We had earlier linked our VSTS to Azure for this reason so that the Subscriptions and App Services get auto populated and linked. The VSTS automatically takes care of managing the credentials and uploading to the Azure App Service.
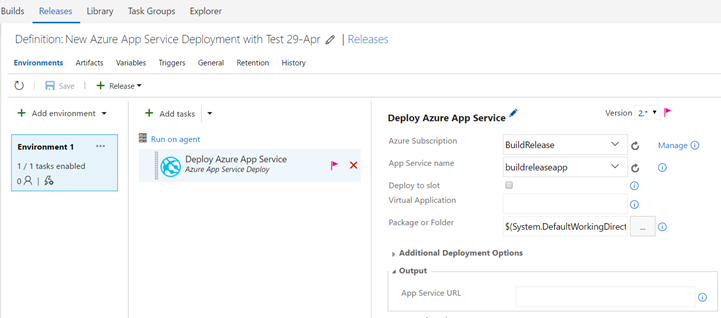
Figure 13: Deploy to Azure App Service
Switch to the Triggers section and set the Branch name as master as shown in Figure 14 so that our release is triggered every time a build is available for the master branch. Click on the Save icon to save our changes. This completes our basic configuration of VSTS Build and Release configuration. Now we are all ready to test out our CI platform!
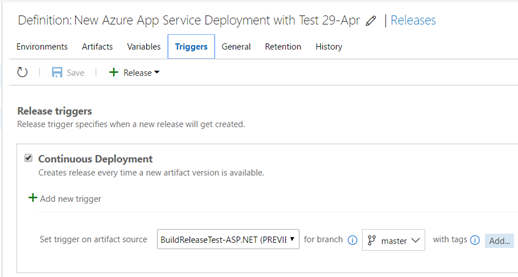
Figure 14: Setup Release Trigger
Testing Our Configuration
You can make some changes to any of your files and push a change to your source control. This should trigger an auto build as we have configured it. On the VSTS portal as soon as a new push it made to Git, it will auto-trigger a build. You can see in Figure 15 that a Build is in progress. Clicking on the build number will take you to the Build Details and you can see a complete log of the build progressing on the Build Agent. At times, I have seen that the Build fails when it's not able to download NuGet packages or NPM packages. So, it's essential to monitor the build and Queue it again in case you see such errors.
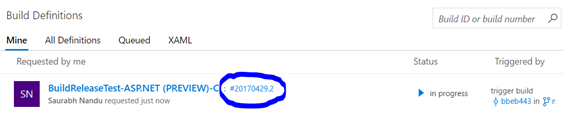
Figure 15: Build in Progress
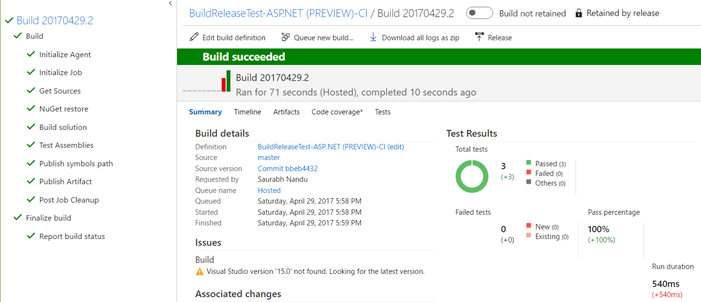
Figure 16: Build Status and Details

Figure 17: Unit Tests Successfully run on Build Agent
Once the Build is completed, it's artefacts are version and uploaded and it triggers the Release process. You can monitor the progress if the release from the Releases tab and clicking on the release number in progress as shown in Figure 18. You can see below that my release has succeeded and the build has been deployed to the server.
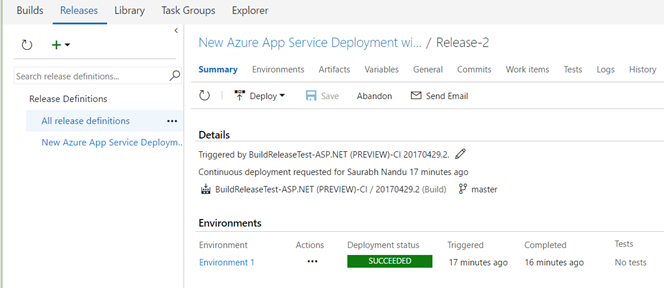
Figure 18: Release Status
Once the release is successful launch the application in your browser using the Azure Web App site URL, navigate to the Register page and register a new user. This will trigger Entity Framework to start creating the tables on the new Azure SQL Server database. Every time you modify the schema of the database, ensure that you run migrations on your project locally and then once the build is published run the page like Register or Login which will internally cause Entity Framework to start the database migration process on Azure SQL Database.