Add Images along with Text using Document Types and Parital View in Umbraco 7
While creating an Umbraco site, I came across the need for displaying images along with additional text information which can be setup and managed using Umbraco CMS administration tool. In this blog post, I will explain how to create Document Types and Partial View for a Umbraco 7 website using MVC to display the details.
This article assumes that you already have knowledge about installation of Umbraco 7 and have configured its rendering engine to use ASP.NET MVC for the pages.
Create Document Type
In Umbraco CMS administration tool, click on Settings section and right-click on Document Types to create a new document named as TeamMemberPage. Let Master Document Type be set to None and Create matching template be checked (refer figure 1).
Settings > Document Types > TeamMembersPage
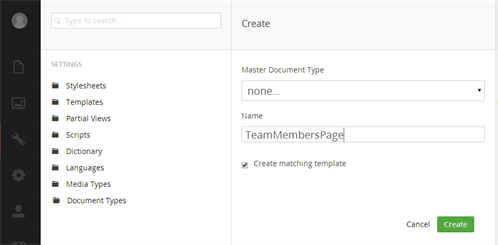
Figure 1: Create new Document Type 'TeamMemberPage'
Structure For TeamMemberPage
Now click on TeamMemberPage document type and switch to Structure tab and set the checkbox for Allow at root option (refer figure 2).
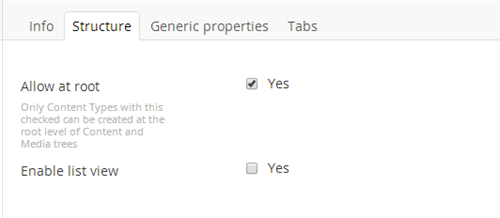
Figure 2: Create root element
Creating 'MemberListing' Document Type under TeamMembersPage
Next step is to create document type for listing team members which will have the properties such as member photo, member name and member designation.
Right-click on TeamMembersPage document type to create a new document named as MemberListing (refer figure 3).
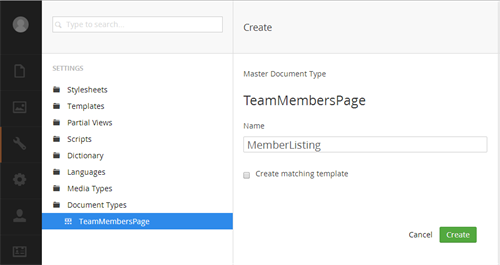
Figure 3: Create new Document Type 'MemberListing'
Switch to the Tabs section and add a new tab 'Content' then switch to the Generic properties and click on the Click here to add a new property link to add the 3 properties as listed below and save them (refer figure 4 – 7).
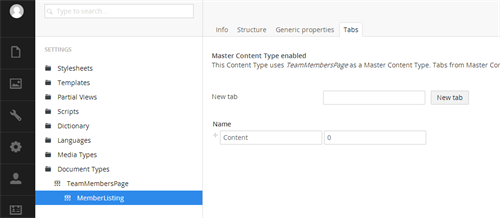
Figure 4: Create new Tab 'Content'
Name: MemberPhoto
Alias: memberPhoto
Type: Media Picker
Tab: Content
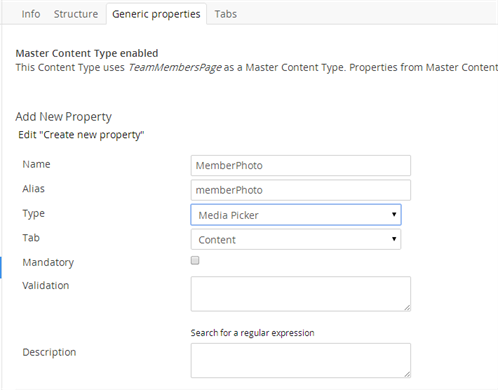
Figure 5: MemberPhoto property
Name: MemberName
Alias: memberName
Type: Textstring
Tab: Content
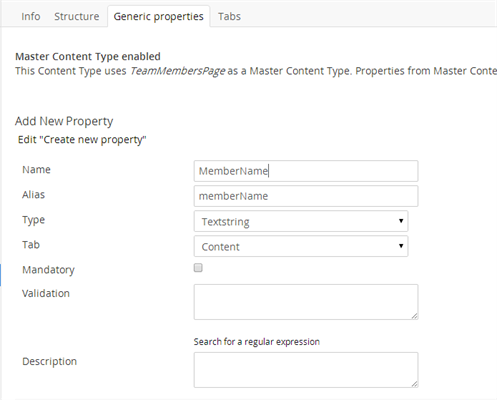
Figure 6: MemberName property
Name: MemberDesignation
Alias: memberDesignation
Type: Textstring
Tab: Content
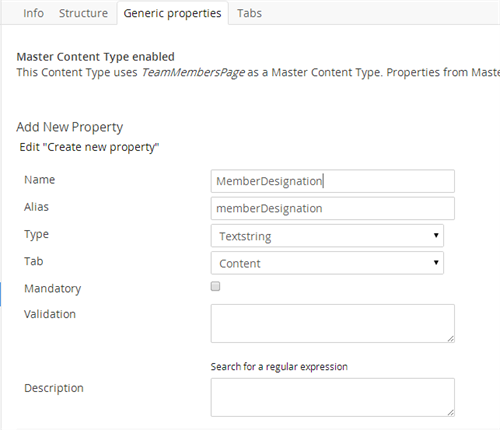
Figure 7: MemberDesignation property
Add another document type 'MemberList'
Next step is to create document type MemberList which will enable to add multiple member details for the page. Right-click on TeamMembersPage document type to create a new document named as MemberList (refer figure 8).
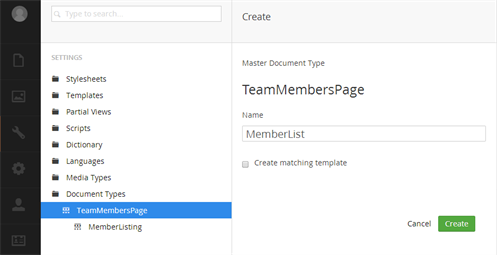
Figure 8: Create new document type 'MemberList'
Structure for MemberList
Now click on MemberList document type and switch to Structure tab and set the checkbox for Enable List View option and also select 'MemberListing' document type as Allowed child nodetypes (refer figure 9).
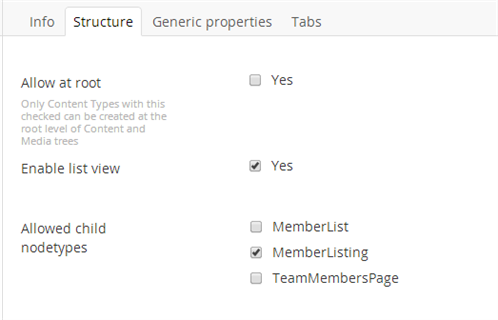
Figure 9: Structure for 'MemberList'
Make member list as child node for TeamMemberPage
Next step is to add MemberList as child nodetype for TeamMembersPage. For this step, click on Settings > TeamMembersPage
Switch to Structure tab and select MemberList as Allowed child nodetypes (refer figure 10).
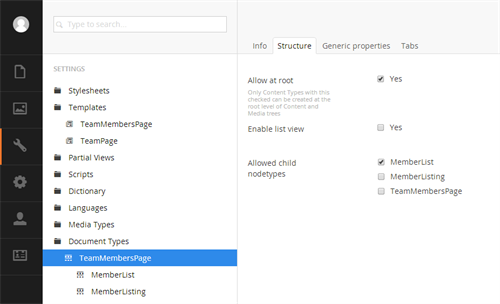
Figure 10: Structure for 'TeamMembersPage'
After creating all necessary document types, the next step is to add content to the site.
Add Content
Click on Content and select TeamMembersPage which is the root element of the site. Insert proper name for the content and click on Save and publish (refer figure 11 and 12).
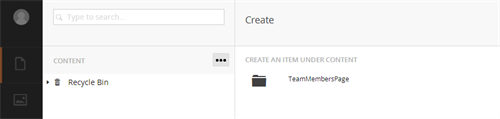
Figure 11: Add content 'TeamMembersPage'
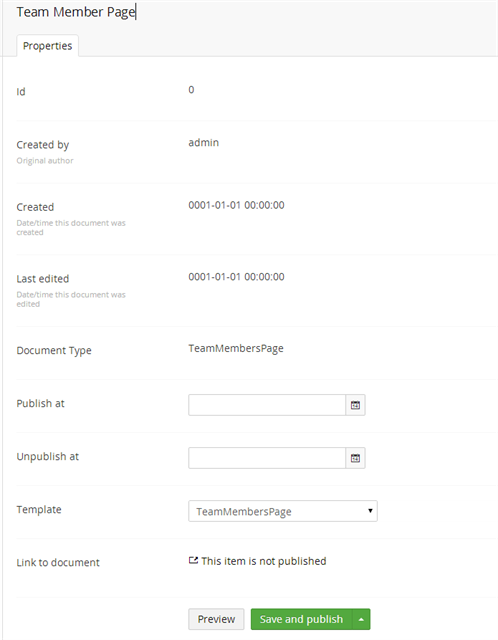
Figure 12: Save 'Team Member Page'
Next step is to create content under TeamMembersPage for inserting team member details.
Click on Content > Team Member Page then select MemberList, give a proper name to MemberList and click on Save and Publish (refer figure 13 and 14).
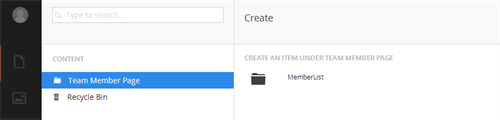
Figure 13: Add content 'MemberList'
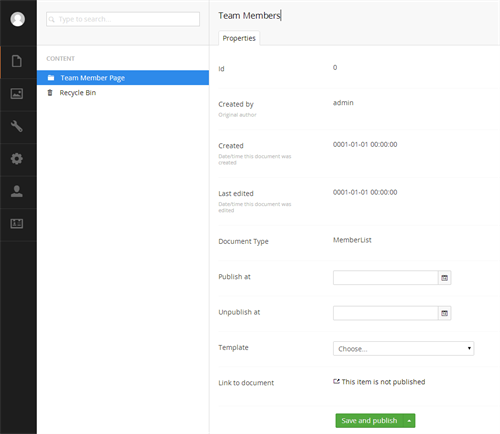
Figure 14: Save content 'Team Members'
Next step is to insert details for the MemberList. Click on Content > Team Members, under Child Items tab click on Create and select MemberListing (refer figure 15).
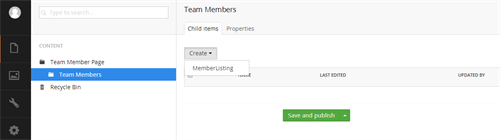
Figure 15: Create 'MemberListing' elements
Enter your Team details
After selecting MemberListing the following screen will be displayed with the properties like Member Photo, Member Name and Member Designation. Add required details in the appropriate fields and then click on Save and publish (refer figure 16).
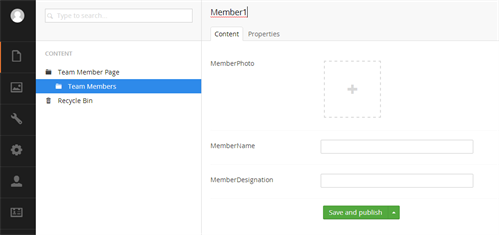
Figure 16: Save Member Details
After the first record is created, the following screen is displayed which will list down all the records (refer figure 17).
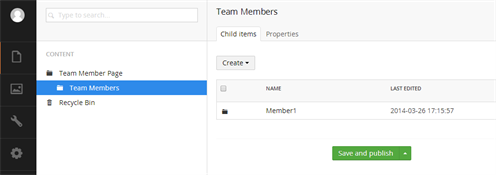
Figure 17: List of records
Above steps are required to add the required content from Umbraco CMS administration tool and below is the code which will loop through the contents and display it on the site.
Right click Partial Views under Settings and select Create from the menu. In the Create dialog give the Name as GenerateTeamMemberList and set choose a snippet as Empty and click Create to create the Partial view and open its editor. Copy-paste the following code into the editor and click the Save button to save the partial view.
@inherits Umbraco.Web.Mvc.UmbracoViewPage

@using System.Collections;
@{
    Layout = null;
    var parent = Model.AncestorOrSelf(1);
    List nodeIds = new List();
    foreach (var page in parent.Children)
    {
        if (page.DocumentTypeAlias == "MemberList")
        {
            foreach (var child in page.Children)
            {
                nodeIds.Add(child.Id);
            }
        }
    }
    List slides = new List();
    foreach (var nodeId in nodeIds)
    {
        if (nodeId != null)
        {
            var publishedContent = Umbraco.NiceUrl(Convert.ToInt32(nodeId));
            if (!String.IsNullOrEmpty(publishedContent) && publishedContent != "#")
            {
                slides.Add(Umbraco.TypedContent(nodeId));
            }
        }
    }
    foreach (var slide in slides)
    {
        if (slide != null)
        {
		<div style="float: left; padding: 10px;">
		@if(slide.GetPropertyValue("memberPhoto")!=null)
		{
			<img src="/@Umbraco.TypedMedia(slide.GetPropertyValue(" alt="" width="80" height="70" />
		}
		<h6>@Html.Raw(slide.GetPropertyValue("memberName"))</h6>
		<p>@Html.Raw(slide.GetPropertyValue("memberDesignation"))</p>
		</div>
        }
    }
}
To use this partial view, include it in your TeamMembersPage using the following code.
@inherits Umbraco.Web.Mvc.UmbracoTemplatePage
@using ClientDependency.Core.Mvc;
@{
    Layout = null;
}
<div>
 @Html.Partial("GenerateTeamMemberList",@Model.Content)
</div>
Published Team Members Page
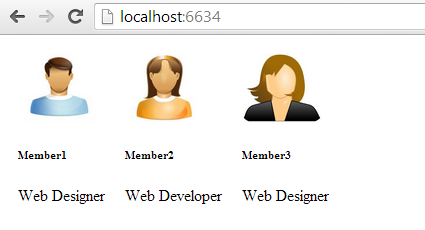
Figure 18: Image displayed along with Text
You can use this approach to create a jQuery image carousel or a photo album.